Vegan Zha Jiang Noodles

I love these vegan black bean noodles. Known as Zha Jiang Mian (炸醬麵) in China or Taiwan and even Korea. These are great for summer when the heat is too intense for soups. Traditionally, Zha Jiang Mian is made with pork. I love this vegan version made with tofu — you really don’t miss the meat here! I’ve made it for western friends and they all love the black bean sauce.

If you’re new to bean sauces, they come in spicy, sweet, and salty variations. It can be intimidating but also forgiving if you buy the wrong kind. Just adjust the seasoning to taste. The brands I used for this recipe is pictured below.

Black bean paste, sweet bean paste and my favourite knife cut noodles.

Vegan Black Bean Zha-Jiang Noodles (炸醬麵)

Serves 2-3

Ingredients

Sauce

  • 2 tablespoons salty bean paste (or Soybean Paste / Dou ban Jiang豆瓣醬)*

  • 6 tablespoons of sweet bean paste (Tian Mian Jiang 甜麵醬)

  • ½ cup Shaoxing wine, rice wine, or sherry

  • 1 tablespoon sugar

  • 1.5 cup (120 grams) chopped mushrooms (I use white button or king oyster mushrooms)

  • 1 package (285 grams) of firm tofu, patted dry and crumbled into pieces

Fragrant Oil *

  • ½ cup oil

  • 1 onion cut into 8 wedges

  • 1 green onion, chopped coarsely

Other Ingredients

  • Noodles of choice*

  • Shredded cucumber and carrot

  • Chopped cilantro or green onions (optional)

Instructions

  1. Place all the bean pastes in a large mixing bowl, add the Shaoxing wine, and mix until well combined. Set aside.

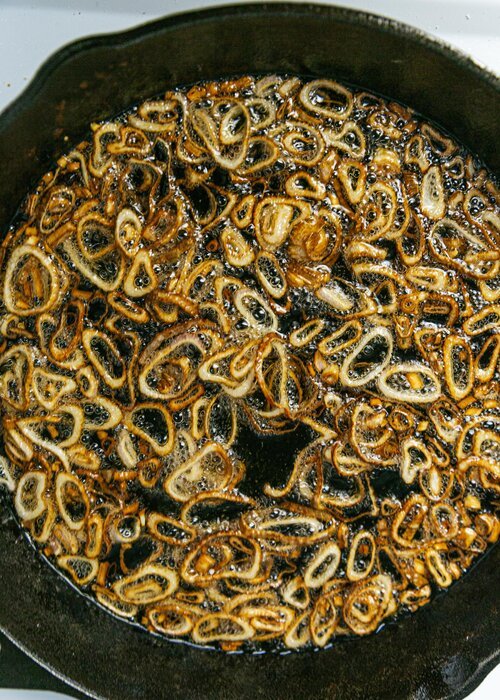
  2. Using a large non-stick pan, add ½ cup of oil, the chopped onion, and green onion. Cook over medium-low heat until the onions turn brown and crispy, around 8-10 minutes. Use a slotted spoon to discard or save the onions for other dishes.

  3. In the same pan, add the crumbled tofu and fry until golden brown. stirring continuously. Add in the mushrooms, and cook until softened and aromatic.

  4. Stir in the bean sauce and turn the heat to low. Stirring constantly until the sauce evaporates into a chunky mixture. Adjust with sugar or salt to taste.

  5. Cook noodles as directed and set aside.

  6. To serve, spoon sauce over noodles and top with shredded cucumber, carrot, green onions, or cilantro (optional). Serve warm.

Cooking notes:

• If you’re new to bean sauces, they come in spicy, sweet, and salty variations. It can be intimidating but also forgiving if you buy the wrong kind. Just adjust the seasoning to taste.

• The black bean paste is very salty! Go easy on it if it’s your first time cooking with it.

• Substitute the fragrant oil with different flavored oils like shallot oil.

• I like to double the portions for leftovers. The sauce is very good served with summer vegetables over a salad.

Tofu Gado Gado

My husband made this Indonesian Tofu Gado Gado for me in the early stages of our relationship. It’s a great example of our mutual love for food — fresh flavors, filling, light, and exotic without being too fiery. A classic you’ll come back to again and again.

I’ve tweaked some ingredients to maximize the use of dried pantry goods. For the salad — feel free to substitute with bean sprouts, julienned carrots, purple cabbage, radishes, or top with crispy shallots. I’ll say that the warm potatoes with crispy napa cabbage are the highlights for me here.

Halve or double the portions depending on the party size you’re serving.

Tofu Gado Gado

Serves 4 people as a main course, 6 as a side dish

Ingredients

Salad

  • 1 tbsp vegetable oil

  • 1 pack of fried tofu*

  • 500 grams potatoes, cubed into 1-inch pieces

  • 4 eggs (omit for vegan)

  • 200 grams green beans, ends trimmed and halved lengthways

  • 200 grams Napa cabbage, washed and finely shredded

  • 1 Persian cucumber or 1/2 cucumber, sliced into thin rounds

  • a handful of coriander leaves, picked and roughly chopped

  • 4 tbsp roasted peanuts, chopped

Spicy Peanut Dressing

  • 50g peanut butter

  • 2 1/2 tbsp soy sauce 

  • 1/2 tbsp honey

  • 1 tbsp fish sauce* (omit for vegan/vegetarian)

  • 1 tbsp cane sugar

  • 1 garlic clove

  • 1-inch piece of ginger

  • 2 fresh or dried red chilies (optional)

  • Juice of 1 lime

  • 75 ml coconut milk

Instructions

  1. Using a large pot, bring 1.5 liters of salted water to a boil. Add the potatoes, and eggs and cook for 9 minutes. While the ingredients are cooking, prepare an ice bath. When the timer goes off, transfer the eggs into the ice bath and chill. Continue cooking the potatoes until fork tender.

  2. Using a blender or food processor — blend all of the peanut dressing ingredients. Adjust the salt and spices to taste. Add more coconut milk or water for desired consistency. Set aside.

  3. When the potatoes from step 1 are almost tender, add the green beans, fried tofu, and boil for 1-2 minutes until tender and bright green. Drain the vegetables, tofu and run under cold water until chilled. Slice the fried tofu into bite-sized pieces.

  4. Peel and cut the chilled eggs in half. Assemble the salad by layering potatoes, green beans, tofu, sliced cucumber, and eggs. Serve immediately with peanut sauce, chopped peanuts, and cilantro.


Cooking Tips:

  1. Substitute fried tofu with firm tofu (cubed and fried) or with tempeh.

Chickpea Sesame Cookies

Also known as Chickpea Magic Cookies —these are full of protein, refined sugar-free, and great for breakfast or a snack on the go.

The miso isn’t super noticeable here and acts as a good savory touch to balance the sweet. Replace with a pinch of salt or up the amount for more umami. This tastes like a classic peanut butter cookie with healthy substitutes.

Chickpea Sesame Cookies

Yields around 14 cookies

Ingredients

  • One 15 oz can of chickpeas, rinsed and drained

  • 6 pitted dates

  • 1/2 cup creamy peanut butter

  • 1/4 cup rolled oats

  • 1/4 cup maple syrup

  • 1 tsp vanilla

  • 1/2 tsp baking powder

  • 1/2 tsp baking soda

  • 2-3 tbsp miso paste (sub with a pinch of salt)

  • 1/2 cup raw sesame seeds (optional)

  • Rose petals, for garnish (optional)

instructions

1. Preheat the oven to 350 degrees F. Prep a baking sheet with parchment paper.

2. Blend all ingredients in a food processor except sesame seeds, and rose petals (if using)

3. Blend until smooth scraping down the sides as necessary.

4.  Fill a pasta bowl with sesame seeds. Using a spoon — scoop around 2 tbsp of cookie dough and dip the dough side into the sesame seeds. Push cookie dough onto the baking sheet, flatten and garnish with rose petals.

5. Bake for 13-15minutes. These are soft out of the oven but will firm up as they cool. Enjoy!

*Replace the sesame seeds and rose petals with 1/2 cup of chocolate chips for Chickpea chocolate cookies 🍪.

Snow Fungus Dessert Soup

This is an incredibly healthy + nourishing sweet soup we eat in Asia all year round. It’s served from street-side dessert shops to high-end buffet places as a light dessert after a big feast. The nutritional benefits of this soup are endless. To those who have never tried snow fungus — it’s also known as Silver Ear Mushroom. The name is a lot more intimidating than the taste, which resembles and soft jelly. You can pick it up at Asian grocery stores in dried packets. Look for snow fungus that is yellow in color, as the white ones might have been bleached.

Snow fungus is full of Vitamin  D and collagen that gives you plump skin. Red jujube (dates) is the most popular beauty fruit for Asian women. When I lived in China — I had friends who would religiously eat eight per day!

Benefits from these ingredients include:

  • Red Dates — lots of vitamin C, iron, and minerals. Great for your immune system

  • Rock Sugar — good for healthy lungs, soothing to the stomach

  • Dried Longan — warming, builds an appetite, helps with insomnia, and is great for your skin

  • Lily Bulb — detoxes your body, good for blood flow and immune system

  • Lotus Seeds — Lowers blood pressure and is good for your heart

  • Dried snow fungus and ingredients

Dried snow fungus and ingredients

Snow Fungus with Lotus Seed Soup 冰糖银耳莲子湯

Serves 6 | prep time: 30 mins | cooking time: 2-hours stove top, 30-mins instant pot

Ingredients

  • 30 grams dried snow fungus 

  • 80 grams Lotus seeds 

  • 50 grams Red dates

  • 30 grams Lily bulb (optional)

  • 20 grams dried Longan (optional)

  • Rock sugar or any mild sugar of choice, to taste

Instructions

  1. Soak the snow fungus, lotus seeds, and lily bulb for 1 hour or overnight. Remove the stem and tough parts of the snow fungus and cut them into small pieces. If there are lotus hearts in the lotus seeds – remove them as they are bitter in taste.

  2. Rinse the red dates, goji berries, and set aside.

  3. In a pot over medium-high heat, add water, snow fungus, lotus seeds, and goji berries. After the soup comes to a boil, lower the heat to a gentle simmer and cook for 1-2 hours.* The snow fungus will soften and the soup will become gelatinous and jelly-like. If the snow fungus tastes crunchy, continue cooking until it softens.

  4. Add the rock sugar to taste and stir to dissolve. Serve straight away or chilled.

Cooking notes:

  1. For Instant Pot, add everything into the pot, seal, and set on high for 30 minutes. Let the pressure release naturally.

  2. For winter, I added a small handful of dried longan to add heat to the soup. You can add it in step 3 with all of the ingredients.

Lentil Dal with Spinach and Tomato

India is by far one of the most memorable trips I’ve taken and a place I’d love to get back to. So naturally, it earns a section on the blog. India is life turned on its head — the scents, sights, and crowds that leave you a little stunned and possibly revolted. I can still recall traveling through Kerala and the taste of coconut sambar and mustard seeds on my tongue, heaped on fresh dosas I consumed daily. 

One day, India will be a chapter in a cookbook I’m sure. For now, I cook through my favorite inspirational role model — Madhur Jaffrey — the Godmother of Indian cuisine. Her memoir “Under the Mango Trees” is a stunning read I highly recommend.

This Lentil Dal with Spinach and Tomato is a favorite of mine. Vegan, hearty, warming, and perfect with rice or naan. Made often to bring the smell of Indian cooking to my kitchen.

Lentil Dal with Spinach and Tomato

Serves, 2–3. I like to double this recipe and have leftovers over the week. Recipe adapted from Madhur Jaffrey’s Vegetarian India

Ingredients

  • 11/2 cup red lentils (masoor dal), rinsed a few times until the water runs clear

  • 1/2 tsp ground turmeric

  • 11/2 tsp salt

  • 3 tbsp olive oil, ghee, or peanut oil

  • 1/2 tsp whole brown mustard seeds* see note

  • 1/2 tsp whole cumin seeds

  • 2 dried red chilies

  • 7–8 curry leaves (I used bay leaves)

  • 1 large onion (8 oz), peeled and diced

  • 2 cloves garlic, peeled and minced

  • 11/2 tsp fresh ginger, peeled and grated

  • 2 medium-sized (10 oz) tomatoes, peeled and diced

  • 5–6 oz spinach, washed and chopped into small pieces 

  • 1/4–1/2 tsp red chili powder, to taste (optional)

  • Freshly ground black pepper, to taste

Instructions

  1. In a medium-sized pot, add the dal with 5 cups of water. Bring to a boil and skim off the bubbly froth as it rises to the top. Careful to not let it boil over! Stir in the turmeric, cover the pot partially with a lid and cook for 20-30 mins until soft. When done, add the salt to taste.

  2. While the dal is cooking, heat the oil (or ghee) in a medium nonstick pan over medium-high heat. When hot, add the mustard seeds and fry for a few seconds until they start to pop. Immediately add the cumin seeds and fry for 5–6 seconds. Add the red chilies and fry until they darken in color. Add in the bay leaves(or curry leaves), stir once, and add the onions. Fry for 7–10 minutes until the onions are softened and browned.

  3. Add the ginger, garlic and cook for another 2 minutes until golden and fragrant. Add the diced tomatoes and fry for 5–6 minutes until soft, mashing them slightly with the spoon as you cook. Add the spinach with 1/2 cup water. Stir and bring to a simmer until the spinach softens and shrinks in size, around 10 minutes.

  4. When the dal has finished cooking, add the spinach mixture and stir well. Add red chili powder, salt to taste with freshly ground pepper. Serve hot with naan or rice and a generous dollop of yogurt. The leftovers keep in the fridge for 2–3 days. If it thickens over time, add a few spoonfuls of water.

Cooking notes:

  1. If the mustard seeds pop crazily, cover the frying pan loosely with a lid.

  2. The original recipe called for 1/2 ground asafetida, which you fry for a few seconds before the mustard seeds. I have omitted it since it’s not an ingredient I can find easily in western shops.

Three Cup (Sanbei) Tofu

A plant-based dish with intensely good flavors.

If you have ever been to Asia — you’ll know what I am talking about when you eat at those hole-in-the-wall street restaurants. A gathering place where all levels of society come together and order enough food to cover several tables. You don’t go there for fine dining but for the clatter of smoky woks, clinks of Taiwanese beer bottles (guava juice for the kids), scooters lined out the door, and the non-stop motion of the city.

Traditionally, this dish is made with chicken that I’ve adapted with tofu for plant-based cooking. The name three-cup refers to the equal ratio of rice wine, soy sauce, and sesame oil. The ingredients have evolved and been adapted over time to suit different regions in Taiwan and China. 

This is a dish that is healthy enough to be a household staple, though it doesn’t guarantee any leftovers based on experience. The generous amounts of ginger, garlic, basil, and sesame oil create flavors that are intense and captivating to the taste buds.

If you are new to Taiwanese cooking wine/Mijiu 米酒 — I recommend you pick up a bottle at your local Asian grocery (I get mine from T & T in Vancouver). There are substitutes you can use like Chinese rice wine, sake, dry sherry, or plain vegetable stock but you’ll get the best results from Taiwanese cooking wine. It’s what I grew up with.

This is the brand I get from my local Asian store. Made in Taiwan.

Three Cup Tofu

Serves 2,

Ingredients

  • 14 oz (1 package) medium-firm tofu, drained and patted dry

  • 3-inch knob of ginger, sliced into thin pieces*

  • 5 cloves garlic, sliced

  • 1 Thai red chili, chopped into pieces

  • 1 packed cup of fresh Thai basil, roughly chopped

  • 1/3 cup cornstarch

  • oil for cooking

Sauce

  • 3 tbsp Taiwanese cooking wine 米酒 (sub rice wine/sake/vegetable broth if you must)*

  • 3 tbsp soy sauce⁣ or Tamari

  • 3 tbsp sesame oil⁣

  • 1 tbsp sugar⁣

  • ⅓ cup [80g] water⁣

Instructions

1. Dry the tofu with paper towels (I let mine drain on a paper towel while I prep). Slice the tofu in half lengthwise and cut each half into 1cm-thick slices or cubes.

2. Place the cornstarch in a large bowl and coat the tofu slices one by one, on all sides. Add more cornstarch if needed. Lay the coated tofu slices on a large plate for frying, making sure not to overcrowd them.

3. Heat a large frying pan over medium-high heat and add 2 tablespoons of oil. When the oil is hot, fry the tofu until golden and crispy, flipping every 3–5 minutes. This will take around 10 minutes. If the tofu cooks too quickly, lower the heat to medium.

4. While the tofu is frying. Add all the sauce ingredients into a bowl. Stir to dissolve the sugar.

5. Remove tofu from the pan and set it aside in a bowl. In the same pan over medium-high heat, add 2 tablespoons of oil and fry the ginger pieces until brown and golden, around 1 minute. Add the garlic and chili until they are crispy and become incredibly fragrant. Making sure the aromatics do not burn.

6. Pour in the sauce and stir until the sugar has completely dissolved. Add the tofu slices and toss to combine. Lower the heat to medium, add the Thai basil and cook until the sauce has reduced to a syrupy state. Turn off the heat and serve warm with rice. 

Cooking Notes:

Ginger: Make sure to fry the pieces until golden brown on all sides. Ginger, unlike garlic — lasts a lot longer in hot oil. Make sure to separate their cooking processes.

Taiwanese Cooking Wine/Rice Wine: See the photo here for the brand I use.

Garnish: Serve with Thai basil, cilantro, or green onions.

Japanese Onion Salad Dressing (Wafu)

Wafu (和風) is a popular Japanese salad dressing which is basically an onion vinaigrette. It takes 5 ingredients to make and pairs perfectly with greens, lettuce, cucumber for an appetizer or a refreshing side.

This dressing brings me back to my high school days when I worked at Mos Burger — a Japanese chain restaurant that specializes in rice burgers. Boy, I loved everything on the menu — fish fillets, pomelo ice teas, organic rice patties (some of my coworkers used them to make fried rice). It was a memorable and delicious time.

Among their menu, Wafu salad was a bestseller. It had completely slipped my mind until I came across it on Adam Liaw’s social media. Making it brings me back to the school days — walking home after an evening shift, the jasmine-scented gardens of Chang Kai Shek memorial hall, koi fish ponds, and the many meals I shared with my friends. I will be eating lots of Wafu dressing on salads this summer.

Japanese Onion Salad Dressing (Wafu/和風醬)

Ingredients

  1. 1/2 onion, roughly chopped (around 1 cup)

  2. 1 tbsp soy sauce

  3. 2 tbsp rice vinegar (sub-seasoned rice vinegar and omit the sugar)

  4. 1 tbsp cane sugar

  5. 1/2 cup grapeseed oil (sub olive oil)

  6. 1/2 tbsp toasted sesame seeds (optional)

Instructions

  • Add all of the ingredients aside from the oil into a blender or food processor. Pulse and blend into a thick dressing. Don’t overblend.

  • Top with oil of choice and sesame seeds. Seal the jar, and give it a good shake until the ingredients emulsify. Serve over salad or soba/rice noodles. Dressing keeps for 3-4 days in the fridge

Cooking Notes:

• Traditionally, the onions are grated with a Microplane grater to preserve texture. I find the blender method easier with limited time on my hands.

• If making beforehand, give the dressing jar a good shake before serving.

Cilantro Salad with Shallot Oil

I had a bunch of cilantro sitting in the fridge leftover from a week of recipe shooting. It felt like a problem waiting for a creative solution. I researched some recipes online and came across the delightful site of Madame Huang, a California native who lived in Taiwan for a number of years.

I love this recipe because I now have a way to use up all my extra cilantro. I also rediscovered a lovely substitute for sesame oil if I ever need something that tastes a little lighter and fragrant —shallot oil.

I grew up eating fried shallots in lots of dishes — a topping over rice noodle soups, folded into steamed turnip cakes or served over vegetables. I usually avoid store brought fried shallots, not trusting the quality of oil they were fried in. A good reason to make one’s own.

This salad calls for an entire bunch of cilantro. Not brown, wilted ones but fresh, vibrant cilantro. I substituted peanuts for cashews and yellow pepper for red since I cannot drop by the grocery store as easily these days. Toasted peanuts on the top of my shopping list next week. 

Shallot Oil

Ingredients

1 cup thinly sliced shallots (around three shallots)
1.5 cup fresh rice bran oil ( sub peanut or grapeseed oil)

*Make this oil at least a day ahead before you want to use it to flavour your dish.

Instructions

Slice shallots into thin rings, as evenly as you can. Heat oil over medium-high heat in a pan. You can tell the oil is ready when there are small ripples on the surface. Test by inserting a chopstick into the oil, it should be covered in bubbles immediately. Sprinkle in the shallots, reduce heat to medium and fry them until they turn a golden brown. Stir often so they fry evenly. Turn the heat off when they are a light golden brown, and fry with the residue heat.

Strain the shallots over a sieve into a vessel. Reserve the shallots as a topping, and use the oil for stir fry, a sesame oil substitute or in other dishes. Alternatively, you can add the cooled oil back into the shallots and use as a topping over rice, noodles or steamed greens

Cilantro and Peanut Salad

Ingredients

1 bunch fresh cilantro*
½ cup fried or toasted peanuts
½ sweet bell pepper 
1 tsp soy sauce
½ tsp sugar
¼ tsp sea salt
2 tbsp shallot oil (sub sesame oil)
1 tbsp toasted sesame seeds

Instructions

Trim and remove the tough or browned stalks of cilantro. Wash in water, shake dry, cut into 1-inch pieces and transfer to a mixing bowl. Prep the bell pepper and slice into small pieces, around the size of a peanut. Add peppers to the mixing bowl.

Toss cilantro with pepper, peanuts and the rest of ingredients. Taste and add more seasoning if you’d like. I added some fried shallots from the shallot oil. Serve as an appetizer or as a side. Also great as a chilled dish, just toss in the peanuts and dressing before serving. 

*As cilantro is the main ingredient, use the nicest bunch you can find.

Avocado Chocolate Cake

Growing up in Taiwan, my definition of avocados revolved around the football-sized Choquette avocado sold in fruit shops or juice stalls at the night market. Bred for their intimidating size and mild flavour — the Choquette avocado is used for smoothies with milk, sugar and pudding. Salad culture in Taiwan is slowly catching up to the west, but it was not after moving to Canada that I expanded my worldview on avocados and the many ways one can eat it in salads, guacamole, ice cream and so on.

I have gone through many flourless chocolate cake recipes but this is a new favourite yet. No blender or spiralizer is needed just two perfectly ripe avocados. The raw batter is heavenly and tastes like a thick chocolate pudding. I would make it just to eat the batter. A gluten-free treat you can make vegan by substituting the butter with cashew butter or olive oil. I made a less sweetened version for Mother’s Day and topped it with edible flowers, dried fruit and cashew cream.

Avocado Chocolate Cake

Serves 8/fills a 13-inch baking pan

Wet Ingredients
2 ripe medium-large avocados
4 eggs

Dry Ingredients
1 cup of cocoa powder
1 3/4 cup brown sugar (use 1 1/2 cup for a less sweet version)
4 tablespoons butter, softened at room temperature
2 teaspoons baking powder
2 teaspoons vanilla extract
1/2 teaspoon sea salt
1/2 cup chopped dark chocolate (optional)

Preheat the oven to 325°F. Grease a 10 x 12-inch baking pan with butter or parchment paper. 

In a large mixing bowl, sift the cacao powder with a sieve into a fine powder. Add the brown sugar, baking powder and sea salt. Mix evenly and set aside.

In a medium mixing bowl, mash the avocados, breaking large pieces with a fork as you go. Crack eggs into bowl one by one, add the butter and stir to evenly distribute. Add the wet ingredients into the dry, stirring and scraping the bottom of the bowl from time to time. Pour the mixture into the baking pan and bake for 25-30 minutes. The middle of the cake should be firm while on the edge of gooey. Let the cake come to room temperature before cutting. Top with chopped dark chocolate, sea salt, edible flowers or cashew cream. 

mom, dad and avocado chocolate cake

Bryant Terry’s Amazing Green Rice

I made Bryant Terry’s Amazing Green Rice today and loved the flavour and different ways of cooking rice with pureed vegetables. Food is really for the spirit as well as the body. I have been enjoying the slow-down time and my weekends hunting for organic greens, chopping and cooking away before sitting down to enjoy the few hours of labour.

If you are looking to venture out of your usual way of cooking, Bryant’s new cookbook Vegetable Kingdom features a lot of afro-vegan recipes. Jamaican dishes, Chinese spices. It really opens up a world of cooking with vegetables. I have a list of purees, veggie roasts and dressings I am looking to make. It is a beautiful example of food as a bridge to sharing that personal yet worldly part of ourselves in the kitchen.

I would love to make onigiri this next, perhaps with sushi rice, some preserved cherry blossoms. I used a cast iron pan for this and was rewarded with a crispy bottom. I would also love to experiment with different coloured vegetables, purple rice, yellow rice, orange rice you name it. I threw in soaked cashews I had on hand (you can use coconut cream) with whatever greens and garnishes I found in my fridge.

Bryant Terry’s Amazing Green Rice

Ingredients

Serves 4–6
1 c tightly packed spinach leaves ( sub with any kind of greens)
1 c tightly packed kale leaves, stems removed
1 1/2 c water (sub vegetable stock and omit the stock cube)
1 vegetable stock cube
1/3 c soaked cashews (or sub 2 tbsp of coconut milk)
Sprinkle of sea salt
1 c long grained rice
1 tbsp oil ( I used butter)
1/2 c diced yellow onion
1/2 c diced green peppers
3 cloves garlic, peeled and minced

Instructions

1. In a blender, puree the greens, water, stock cube, soaked cashews, and salt. Blend until frothy and smooth. Set aside.

2. Wash rice in a sieve. Give it a good shake and set aside.

3. In a medium-sized pan (I used my cast iron) heat oil until hot. Add the onion, bell pepper, and sauté until soft. Add minced garlic and cook for another 2 to 3 minutes. Add the rice and stir until the water evaporates and the rice is lightly toasted and aromatic. Pour in the contents from the blender and turn the heat up to high until the whole thing comes to a boil. Reduce heat to low, cover with a lid and simmer for 15 to 20 minutes.

4. Take the pan off the heat and let it sit for 10 minutes or so with the lid on. Fluff the rice with a fork before serving and top with toasted nuts, chopped herbs, fresh ground pepper, or anything to your fancy. I find it really great satisfying paired with an egg, tofu, or served as a main.

Recipe inspired and adapted from Heidi Swanson. Original recipe creator Bryant Terry

Miso Soup with Yu Choy and Dashi Stock

miso_soup_baby_yu_choy_dashi_stock.jpg

I bought a bag of shiitake mushrooms for vegetarian dumplings the other day and was left with an abundance of dried mushrooms. I have never cooked with shiitake mushrooms till recent and they remind me of street food in Taiwan and a lot of my mother’s cooking.

I remember savouring these explosions of flavour in chicken broths, in the mountains of fried rice noodles grandmother would make when we visit, and in the sticky rice steamed in bamboo leaves during festivals. I also remember being made fun of in elementary school because my classmates told me they looked like tiny slugs. Not to be deceived by looks — these mushrooms are essential to Asian cuisine and can be found in hot pots, stir fry and everything savoury. Something I proudly stock in my pantry nowadays.

Here is a recipe for miso soup using a very simple dashi stock. The watermelon radish serves more as a garnish but adds such a beautiful touch.

My apologies in advance for the abstractness of this recipe, I hope you taste as you go and refrain from taking too many photos as I’ve let food burn in the process. I enjoy serving this soup as an attractive appetizer or for evenings when I want something light and warm. For friends or myself.

Serves 4

Ingredients:

shiitake_kombu_dashi_recipe
sliced_watermelon_radish_ice_water.jpg

Dashi stock
5–6 Dried shiitake mushrooms
Handful of dried kombu (2-3 slices or half a cup if they are sliced)

1. Lightly rinse shiitake mushrooms. Do not wash kombu as the white residue adds flavour. Wipe kombu with a paper towel if you wish.

2. Fill a jar with two cups of water, soak the mushrooms and kombu. Seal and let sit for a few hours or overnight. The stock keeps well so you can make it a few days in advance

Miso Soup
Medium-firm tofu, one package, cut into blocks
Handful of baby yu choy
Miso paste, 3-4 tablespoons
Ginger, 2 slices
Soy sauce, to taste
Watermelon radish, sliced as thin as possible (use a mandolin)
Coriander or arugula, for garnish

Instructions

1. Remove mushrooms from slice into pieces. Discard the stem if you find them tough. Wash baby yu choy and chop into 2-inch pieces. Save some of the flowering tops for garnish. Cut tofu into small squares.

2. Heat the dashi stock and ginger in a pot till it comes to a simmer. Add miso paste and stir to taste. Add tofu to the pot until it boils. Taste the soup, add a few drops of soy sauce if it needs more flavour. Stir yu choy stems in till it comes to a boil again. Add the leafy parts to the soup at the last possible minute.

3. Garnish with sliced radish and coriander. Serve immediately.

Notes: I have found that arugula is a fantastic addition to miso soup. Feel free to substitute baby yu choy with other greens. I have started adding dried anchovies to the soup though the additional taste of fish may not be for everyone.

The Easiest Kombu Dashi Recipe

Here is a recipe for a tasty vegetarian broth made from Kombu (kelp) and shitake mushrooms. Kombu is one of those things that are full of minerals and really good for you. Something my mother always tells me to eat. I would use this in place of vegetable stock, add to chawanmushi (steamed egg curd), or use as a base for miso soup.

When I lived in Northern China, I often saw older ladies and aunties harvesting bundles of green seaweed by the sea. They earned the title “Sea Women” from the locals which I found rather amusing. Those trips to the fish market were quite exotic and I remember seeing starfish, the tiniest river lobsters, and spangled-looking fish. I think of those days with fondness, and laugh at how I tried to cook lobsters in my dorm room. Making these recipes make me recall a lot of the shabu-shabu (Japanese hot pot), light broths and dishes I had growing up in Taipei.

Ingredients
5-6 dried shitake mushrooms, rinsed
A handful of Kelp (wipe clean with a paper towel gently, do not rinse)

Instructions
Add ingredients with 2-3 cups of water in jar or container. Leave to soak for a few hours. I keep mine in the fridge overnight. Discard the kombu but you can slice and add the shitake mushrooms into the soup.

*Add bonito flakes for a richer, non-vegetarian broth. I made the mistake of washing my kombu for the first time and realized the white residue on top is what brings the umami flavour to the soup. You can wipe the kombu gently with a paper towel instead of rinsing it.