Tuna Onigiri Rice Ball Recipe

how_to_make_tuna_onigiri_rice_ball_5.jpg

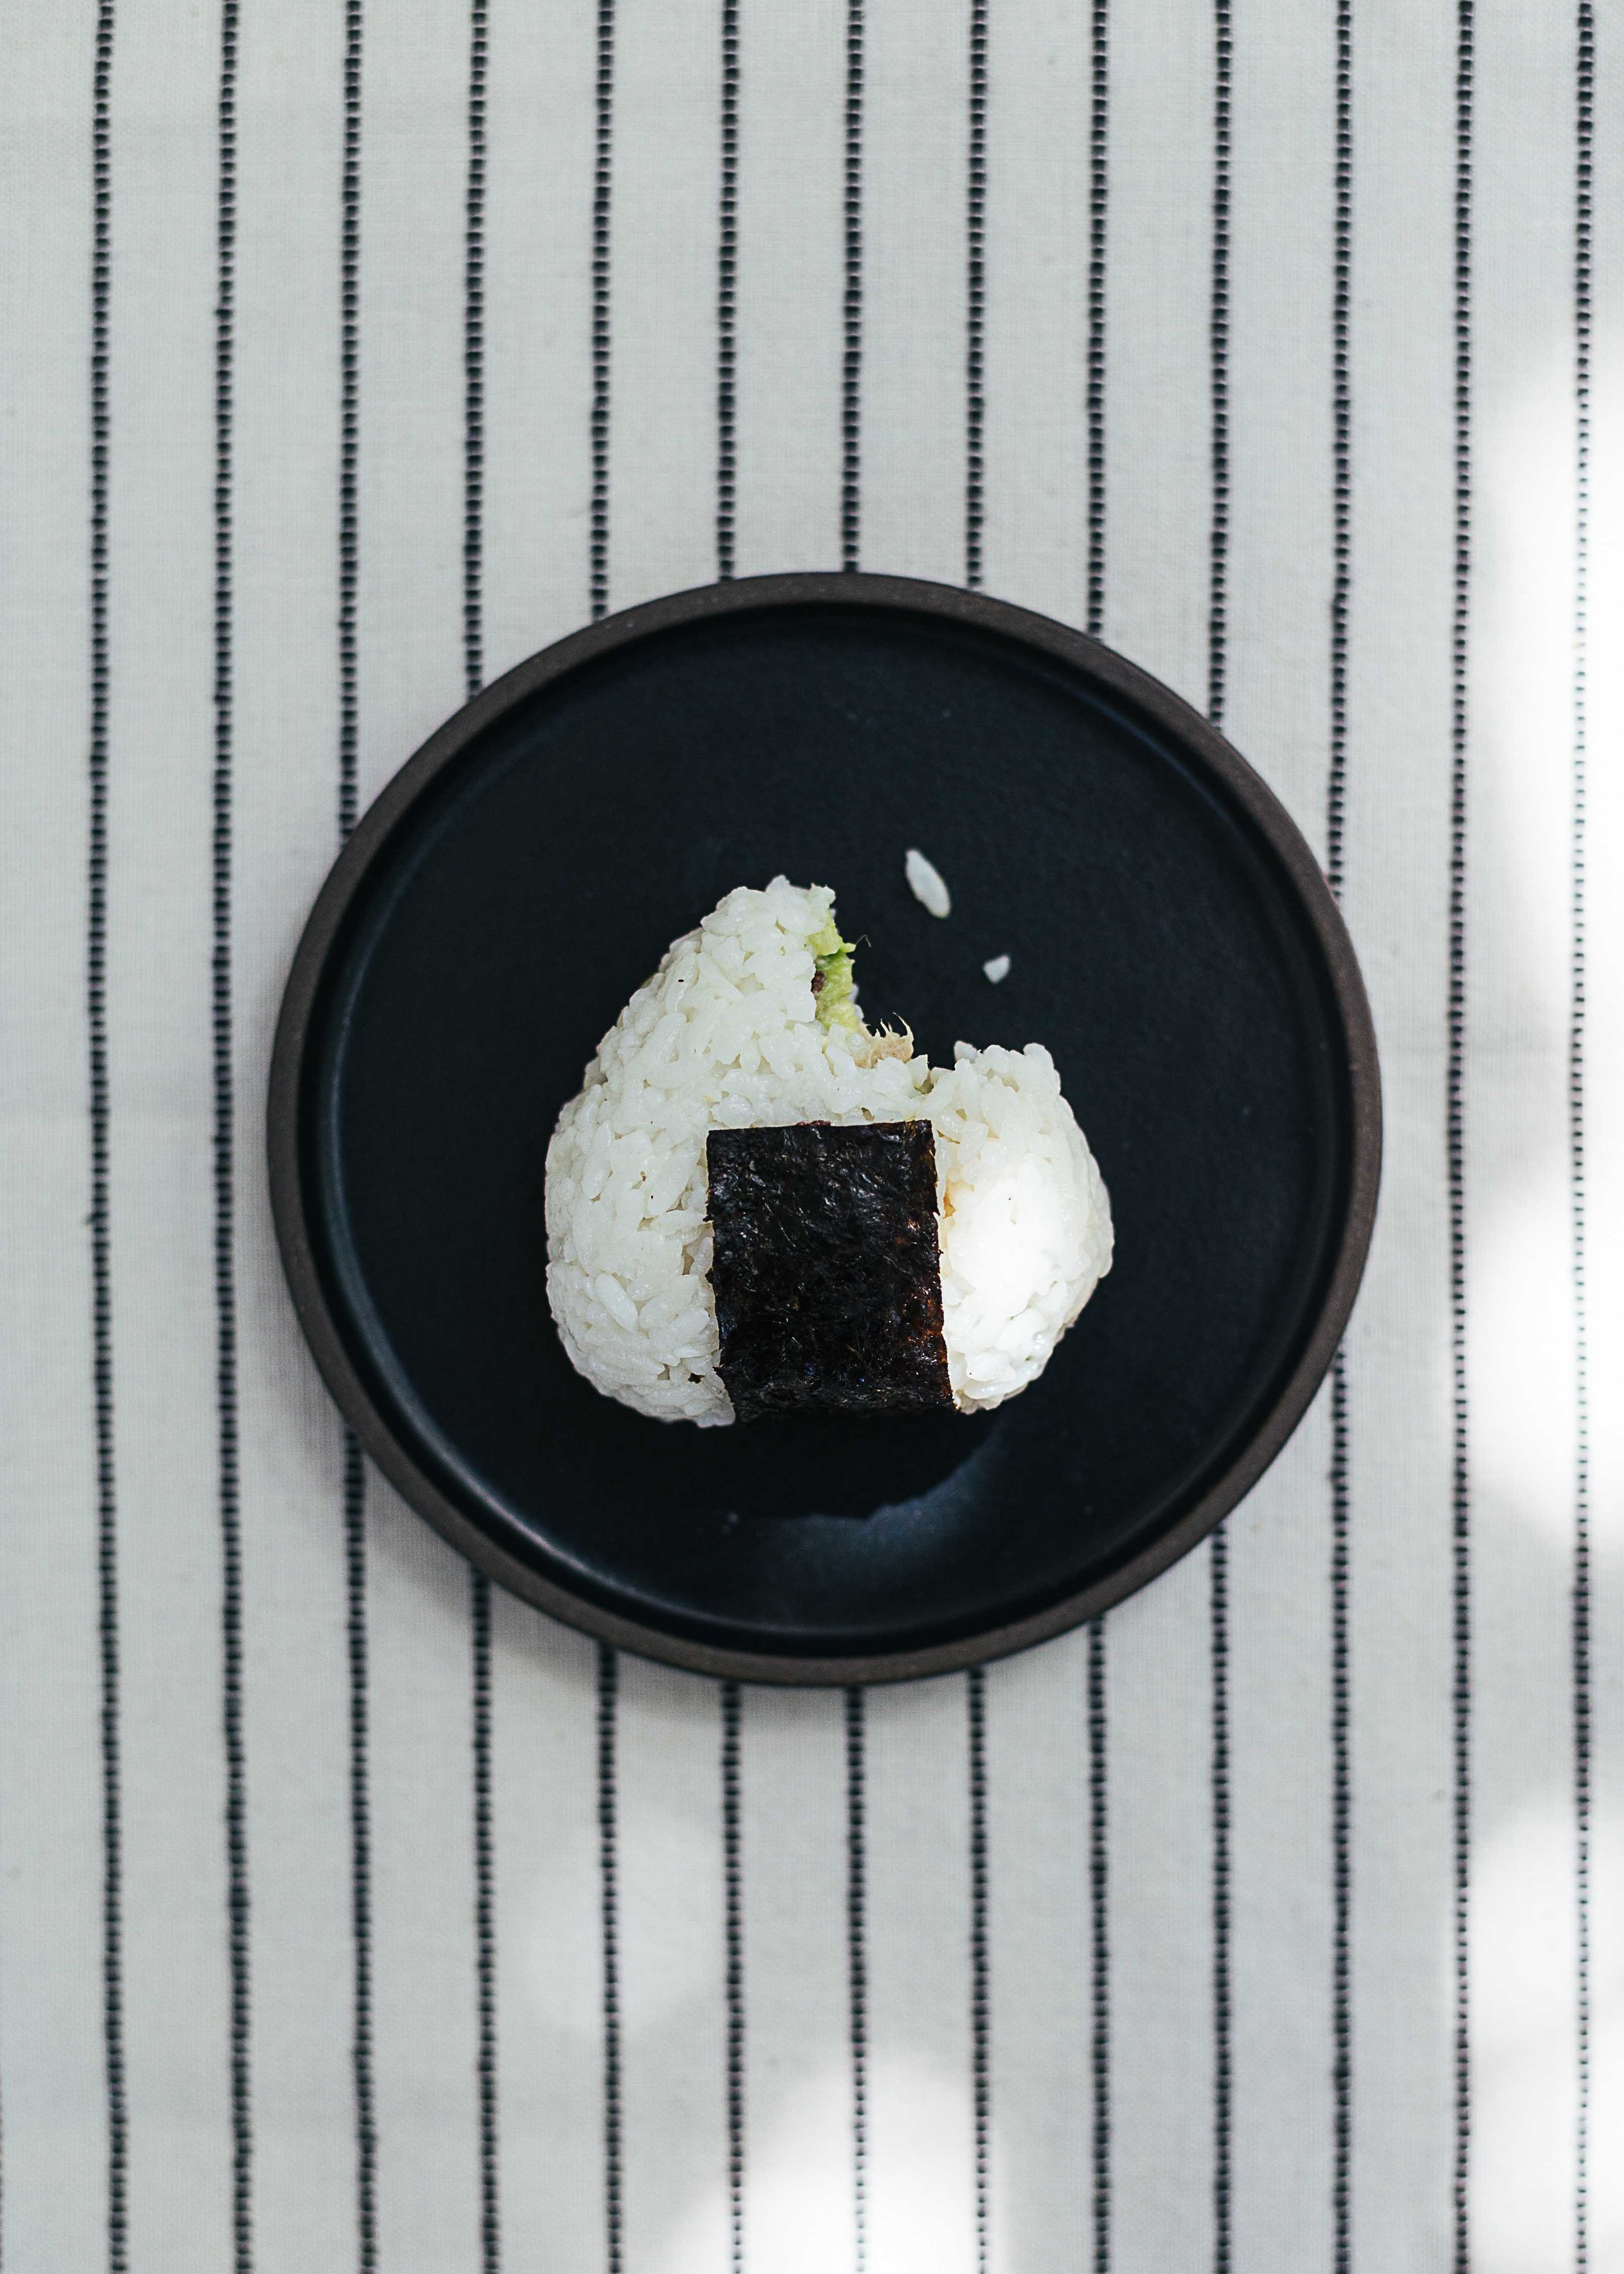
Onigiri! This is a recipe for a little snack that accompanied my childhood years in Taiwan. Found in all of the 7–11 or convenience stores, these triangle-shaped rice balls were many of my breakfast, lunch and late-night snacks.

Even though I have never been to Japan, Taiwanese culture is a culture that is greatly influenced by Japan — who ruled over Taiwan in the 1800s. Some of the influence can be found in old Japanese buildings that are now tea houses or galleries, neat lines at the MRT, my grandpa who spoke Japanese, and a millennial generation that is all about Japanese culture.

These onigiri’s! I remember standing in my school uniform (white collared shirt, pleated skirt, bright orange hat), eagerly choosing my flavour of the day. My favourites — pork floss with mayo, egg, salmon, or chicken teriyaki. Sometimes I would opt out of onigiri’s and go for the traditional Taiwanese rice balls. A heavier version made with sticky rice, fried salty donut, radish pickles, stuffed with pork floss and sprinkled with peanut sugar. They were heavy enough to fill you for hours and go down your tummy very well with a cup of soy milk.

There is something about rolling and shaping warm rice together in your palms. I don’t know if it is the scent of warm rice or act of making onigiri’s that make me want to eat them immediately after. These are great as snacks on the go, picnics, a light meal, or give away and impress your friends.

how_to_make_tuna_onigiri_rice_balls_5-1.jpg
how_to_make_tuna_onigiri_rice_balls.jpg

Tuna Onigiri Rice Balls

Ingredients

1 cup uncooked sushi rice
2 tbs rice wine vinegar
1 tsp sugar
1/2 tsp salt
1 green onion stem, thinly sliced (you can also use cucumber)
1 can of tuna in salted water
1/2 avocado, diced
2 tbs greek yogurt (or mayo)
1 nori sheet, cut into small rectangles

Instructions

  1. Wash rice in a sieve until water is clear. Add 1 cup of water (or refer to amount on rice packaging) and cook until rice is tender. About 15 mins. Let cool.

  2. While rice is cooking, mix can of tuna (squeeze saltwater out with lid when you open the can), avocado, green onions and greek yogurt. Mash and add salt and pepper to taste

  3. Gently fluff rice with a fork. Fold in sugar, rice wine vinegar and salt with a spatula. Don’t over mix.

  4. Place a piece of saran wrap on your hand and measure 1/3 cup of seasoned rice into the wrap. Flatten rice into a flat shape and create an indent in the centre. Spoon in tuna filling and gently form rice into a ball using the saran wrap.

  5. Using your hands, form the rice ball into a triangle. Take off the plastic wrap and wrap a piece of nori around the bottom.

  • The trick to a good onigiri to use rice that is freshly cooked and slightly warm. I felt very Japanese waking up at 7 am to make these for lunch. They will keep for a while in a sealed box in the fridge.

  • The original recipe called for cucumber but I found the green onions to be a nice change.

  • I made these again and mixed in a few spoonfuls of furikake. They were delicious and disappeared very fast at the potluck I brought them to. Enjoy!

how_to_make_tuna_onigiri_rice_balls_1.jpg

Spicy Cucumber Fans

I will call these quarantine cucumber fans, as a cure for worrying — making something is better. They do take some time to produce and is a great way to add veggies to your meal. If you are looking for a simpler recipe with no cooking — my Smashed Cucumber Salad is a great alternative.

This recipe is adapted from Barbara Troops, author of the China Moon Cookbook. I am savouring the pages of her recipes and cooking notes. There is nothing more lovable and inspiring than a tiny American lady, traveling through China, recreating dishes from different regions, and serving them to people who think Sichuan peppercorn is a complete novelty. Give it a read, the recipes will take time to put together and a trip to the Asian grocery store will be needed. I am loving her Sichuan Peppercorn Salt and Hot Chilli Oil, which I am using liberally in my cooking as of the last two weeks. It is also a cookbook that reinforces my dream of getting a gas stove and a smoking hot wok.

This cucumber dish is not quite a salad, but more an appetizer or little dish (小菜) as we call it in Mandarin. I enjoy making this as a side for dumpling nights or simply have in the fridge to add to a heavier meal. You can chop, smash, slice, the cucumber however you please, I do find the fan a delightful change in appearance and texture. Recipe adapted from China Moon Cookbook.

spicy-cucumber-fans.jpeg
spicy-cucumber-fans-recipe.jpeg

Spicy Cucumber Fans 麻辣黃瓜條

Ingredients

Ingredients

  • 5 Persian or Japanese cucumbers

  • 2 tbsp kosher salt

  • 2 wooden chopsticks

Aromatics

Aromatics

  • 1 1/2 tsp finely julienned fresh ginger

  • 1 tbsp minced garlic

  • 1/2 tsp dried red chilli flakes

  • 1/2 tsp Sichuan peppercorns

Seasoning

Sauce

  • 1 tsp soy sauce

  • 2 tbsp unseasoned rice vinegar

  • 3 tbsp sugar

  • 1 tbsp peanut or vegetable oil

  • A few drops of sesame or shallot oil

Instructions

Instructions

  1. Remove the ends from the cucumbers. Set two chopsticks in a V-shape on the cutting board and pin the cucumber inside the point of the V. Cut the cucumber crosswise at 1/8 inch intervals. The chopsticks prevent the knife from cutting all the way into the cucumber, leaving you with a lovely fan shape.

  2. Toss the sliced cucumber with salt and set aside for 30 mins. The salt will soften and drain the cucumber of liquid. Drain the cucumbers, rinse with cold water, squeeze to set aside.

  3. Combine the aromatics in a small dish, combines sauce ingredients in a small bowl.

  4. Heat a skillet over moderate heat until hot. Add the oil, swirl to cover the bottom, reduce heat to low. When the oil is hot enough to sizzle a bit of garlic, add the aromatics. Stir until fragrant, around 10 seconds. Watching the heat so it foams without browning. The smell should be punchy when you take a whiff.

  5. Add the cucumber, toss to combine, then add the sauce. Toss gently to mix and dissolve the sugar. Taste and add more sugar if you’d like. Remove from heat and toss again.

  6. Layer the cucumbers, fan side down in a shallow bowl. Scrape the liquids over top. Seal and chill in the fridge for an hour, or overnight. Do not eat this warm! Serve slightly chilled. The cucumbers are good for a few days in the fridge, although they will lose some of that vibrant color.

How to make Ramen Egg

how_to_make_ramen_egg.jpg

I realized I cannot post a Totoro soba noodle recipe with ramen egg without providing a ramen egg recipe. So here it is. I do offer a word of caution before making these as they are highly desired and addictive. In fact, I ate so many of them from the first few batches that I was thrown off ramen egg for a while. Also, as appetizing as they are, ramen eggs do not travel well so if you try (like I did) to take them to picnics, you’ll end up with a sad brown mess.

These eggs are incredibly easy to make. As long as you have nailed down the consistency of the 6 minutes and 50 seconds jammy centred egg. Choose eggs that are similar in size, use a pot big enough to accommodate the eggs, and give the water a gentle stir after you pop them in to even the temperature.

Ramen eggs are a brilliant way to add protein to a meal, salad bowl, or eat on its own. I enjoy serving it to friends when they visit and bask in the delight of their oohs and ahhs.

You will need:

6 medium/large size eggs (get the best eggs you can, with orangey centres)
Soy sauce, 1/4 cup
Mirin, 1/4 cup
Water, 1/2 cup
Apple cider vinegar, a dash (optional)

To make:

  1. Bring a big pot of water to boil. Adjust it to simmering and gently lower the eggs into hot water with a slotted spoon. Do this in procession as fast as you can. Immediately set a timer for 6:50. Gently stir the eggs. I like to turn the heat up until it comes to a simmer again.

  2. Prepare a large bowl of iced water. You will need ice cubes. When the timer goes off, lift the eggs out of the water with a spoon into the iced water. As fast as you can. Leave the eggs in iced water for a few minutes until the temperature has cooled.

  3. Peel eggs. Give the eggs a firm tap on the counter and peel away. You’ll have a chewed look to some of the softer ones but they do get better with experience.

  4. Mix soy sauce, mirin, water, apple cider vinegar (if you are using any) and soak the eggs in the marinade using a snug bowl. I like to cover the eggs with plastic wrap (or paper towel) to make sure they are fully submerged. Soak the eggs overnight, or 4-5 hours at least.

  5. Serve sliced in half, add a sprinkle of sea salt, green onions, sesame seeds, or enjoy on its own.

*You can double the egg marinade. I follow the 1:1:2 ratio for soy sauce, mirin, water. It keeps well and you can use it to marinate more than one batch of eggs.

*Omit the apple cider vinegar if you’re not feeling as adventurous. I have come across many recipes that call for 1/4 cup of sake and will try a version with that. I like this recipe as it’s simple to make with basic ingredients from the kitchen.


Miso Soup with Yu Choy and Dashi Stock

miso_soup_baby_yu_choy_dashi_stock.jpg

I bought a bag of shiitake mushrooms for vegetarian dumplings the other day and was left with an abundance of dried mushrooms. I have never cooked with shiitake mushrooms till recent and they remind me of street food in Taiwan and a lot of my mother’s cooking.

I remember savouring these explosions of flavour in chicken broths, in the mountains of fried rice noodles grandmother would make when we visit, and in the sticky rice steamed in bamboo leaves during festivals. I also remember being made fun of in elementary school because my classmates told me they looked like tiny slugs. Not to be deceived by looks — these mushrooms are essential to Asian cuisine and can be found in hot pots, stir fry and everything savoury. Something I proudly stock in my pantry nowadays.

Here is a recipe for miso soup using a very simple dashi stock. The watermelon radish serves more as a garnish but adds such a beautiful touch.

My apologies in advance for the abstractness of this recipe, I hope you taste as you go and refrain from taking too many photos as I’ve let food burn in the process. I enjoy serving this soup as an attractive appetizer or for evenings when I want something light and warm. For friends or myself.

Serves 4

Ingredients:

shiitake_kombu_dashi_recipe
sliced_watermelon_radish_ice_water.jpg

Dashi stock
5–6 Dried shiitake mushrooms
Handful of dried kombu (2-3 slices or half a cup if they are sliced)

1. Lightly rinse shiitake mushrooms. Do not wash kombu as the white residue adds flavour. Wipe kombu with a paper towel if you wish.

2. Fill a jar with two cups of water, soak the mushrooms and kombu. Seal and let sit for a few hours or overnight. The stock keeps well so you can make it a few days in advance

Miso Soup
Medium-firm tofu, one package, cut into blocks
Handful of baby yu choy
Miso paste, 3-4 tablespoons
Ginger, 2 slices
Soy sauce, to taste
Watermelon radish, sliced as thin as possible (use a mandolin)
Coriander or arugula, for garnish

Instructions

1. Remove mushrooms from slice into pieces. Discard the stem if you find them tough. Wash baby yu choy and chop into 2-inch pieces. Save some of the flowering tops for garnish. Cut tofu into small squares.

2. Heat the dashi stock and ginger in a pot till it comes to a simmer. Add miso paste and stir to taste. Add tofu to the pot until it boils. Taste the soup, add a few drops of soy sauce if it needs more flavour. Stir yu choy stems in till it comes to a boil again. Add the leafy parts to the soup at the last possible minute.

3. Garnish with sliced radish and coriander. Serve immediately.

Notes: I have found that arugula is a fantastic addition to miso soup. Feel free to substitute baby yu choy with other greens. I have started adding dried anchovies to the soup though the additional taste of fish may not be for everyone.

The Easiest Kombu Dashi Recipe

Here is a recipe for a tasty vegetarian broth made from Kombu (kelp) and shitake mushrooms. Kombu is one of those things that are full of minerals and really good for you. Something my mother always tells me to eat. I would use this in place of vegetable stock, add to chawanmushi (steamed egg curd), or use as a base for miso soup.

When I lived in Northern China, I often saw older ladies and aunties harvesting bundles of green seaweed by the sea. They earned the title “Sea Women” from the locals which I found rather amusing. Those trips to the fish market were quite exotic and I remember seeing starfish, the tiniest river lobsters, and spangled-looking fish. I think of those days with fondness, and laugh at how I tried to cook lobsters in my dorm room. Making these recipes make me recall a lot of the shabu-shabu (Japanese hot pot), light broths and dishes I had growing up in Taipei.

Ingredients
5-6 dried shitake mushrooms, rinsed
A handful of Kelp (wipe clean with a paper towel gently, do not rinse)

Instructions
Add ingredients with 2-3 cups of water in jar or container. Leave to soak for a few hours. I keep mine in the fridge overnight. Discard the kombu but you can slice and add the shitake mushrooms into the soup.

*Add bonito flakes for a richer, non-vegetarian broth. I made the mistake of washing my kombu for the first time and realized the white residue on top is what brings the umami flavour to the soup. You can wipe the kombu gently with a paper towel instead of rinsing it.

Flourless Chocolate Brownies With Sea Salt

A few of my proudest accomplishments this year include: landed an in-house photography job, tried out and stayed on a sports team this spring (the last time I played in competitive sports was elementary school), signed a lease on an apartment (cannot wait to move in next month), committing to put down roots in this transitional city of Vancouver, and the creation of these fabulous flourless chocolate brownies. 

On days when I feel doubt about trading my freelance life for a nine to five — I make brownies and take them into the office. It is simply impossible to eat more than 3 pieces of these brownies and having coworkers to share them with is a very ideal situation. These will never fail to hit the spot when you need a decadent treat in hope that you can stop at three pieces. A timeless brownie recipe.

You know you have created an excellent brownie when both of the recipe developers at work ask you for the recipe. I first had these at a ladies night and immediately asked my friend for the recipe. I am pretty sure the original creator is Nicole Spiridakis. Here is my version with reduced sugar, roasted nuts and sprinkled with Maldon sea salt

Ps: I finally ordered a cooking scale off the internet. It really is worth it when you want to use up the many dark Trader Joe chocolate bars sitting in your cupboard and not worry about fitting them into measuring cups. 

flourless_chocolate_brownies_sea_salt_-6-1.jpg
flourless_chocolate_brownies_sea_salt_sophia_hsin.jpg

Flourless Chocolate Brownies With Sea Salt and Nuts

140g dark chocolate
155g (1/2 cup) unsalted butter
120g brown sugar
3 large eggs, lightly beaten
50g (1/2 cup) cocoa powder, sifted
1/4 tsp salt
11/2 tsp vanilla extract
1/3 cup almond or walnuts, chopped
Maldon sea salt for garnish (optional)

  1. Preheat oven to 350 F. Line a baking pan or sheet with parchment paper.

  2. In 15-30 second intervals, melt chocolate and butter in the microwave and stir until smooth. Set aside too cool. Add brown sugar, cocoa powder, salt, vanilla, and eggs. In that order. Mix but do not over-mix. Transfer batter to baking pan or sheet with a spatula. Top with walnuts.

  3. Bake for 20-30 minutes or until brownie is set and firm in the centre. Time will vary depending on container size. Let sit until cool before cutting into pieces. Top with a sprinkle of flaky sea salt.

These are very delicious eaten cool or slightly warmed. They also keep well in the fridge up to a week. If they last that long.

Dog Shaped Cookies for Dog Lovers | A Recipe

dog-shaped-cookies-recipe-chocolate-6.jpg

I have always been a dog person. Sorry to disappoint my cat loving friends but there is something simply irresistible about dogs. The fluff, the woof, the wag. The joyful leap they make towards you at the end of a long day. That grin when they destroy your beloved possessions and get away with it just because.

For me, the one thing that gets me about travel is the inability to bring your fluffy friends with you. My first dog Lisa the Akita died young (the drama queen in me likes to think it was from heartache) when my family immigrated to Canada. My dachshund who I left behind for college is now retired in Shanghai after many moves, travels, and change of homes. The family discussions, tearful goodbyes, and a little canine who will faithfully wag their tail serving whichever master they end up with.

This post is dedicated to all the dogs I have ever loved and photographed. A dog photo book is the list for projects I want to create and I trust that I am getting close to the process everyday. In the meantime, I will be content making dog shaped cookies.

This is a recipe adapted from Not quite Nigella and Baking Taitai. It is actually a recipe for Weihnachtsplätzchen — German sugar cookies eaten during advent. I love the addition of potato starch which gives the cookie a very biscuit-like texture. Good for convincing yourself you are eating vegetables when having a cookie too many.

These cookies can be time consuming cookie to make. My advice is to invite at least one friend to help with dough rolling, the application of cereal ears and sesame eyes. The end product is meant to be shared with at least four friends.

dog_shaped_cookies_recipe.jpg
dog-shaped-cookies-recipe-chocolate-3.jpg
dog-shaped-cookies-recipe-chocolate-5.jpg

Dog shaped cookies for dog lovers
*
Makes around 20 cookies 

Ingredients

• 1.5 cup flour
• 2 cup potato starch
• 2 teaspoon vanilla extract
• 2/3 cup icing sugar
• 1 cup unsalted butter
• Chocolate cereal for ears (I found a box at Wholefoods in Vancouver)
• Black sesame seeds for eyes
• Baking chocolate chips for noses

Directions

1. Combine butter and sugar (wet ingredients). Beat until fluffy. Add vanilla and beat until combined.
2. Combine potato starch and plain flour (dry ingredients). Mix until combined.
3. Thoroughly mix dry and wet ingredients. If the mixture is too dry, add a few splashes of regular or oat milk. Cover with wrap and rest for half an hour or longer (I pre-make the dough and leave it in the fridge)
4. Line a baking tray with baking paper. Scoop dough into similar-sized balls and flatten them onto the surface of the tray. Add two chocolate cereal ears and a chocolate chip nose. Use a tweezer to add sesame seed eyes (this step requires a lot of patience)
5. Bake at 340F for 15 minutes or until cookie bottoms are golden.

Notes: 

*For cocoa cookies, add a scoop of cocoa powder into the dough and mix until the colors are combined.  Additionally, you can expand from dog cookies to every kind of animal. 

animal-shaped-cookies-recipe-chocolate-7.jpg

Enjoy

My first dog Akita Lisa + brother | Shot on film in Taiwan, 1992

My first dog Akita Lisa + brother | Shot on film in Taiwan, 1992

Roasted Korean Pears With Ginger Recipe

roasted_korean_pears_with_ginger.jpg

One of my new year goals for 2019 is to write more — and what better subject to write about than food? Asian culture is a culture that revolves heavily around food. The making, the eating, the sharing. Oftentimes revolved around gossip, singing, or maybe a game of mahjong for the uncles and aunties. It is something I am really excited to share.

These pears were grown by Papa Hsin in his yard in Canada. As Asian parents go, I didn’t grow up knowing my dad as he spent a lot of time working. As a child, sometimes the only interaction we will have is when he signed my report cards every week (a moment where I will tremble slightly, even though I have always been a top student). But food — will forever be a way Asian parents show love. A catch-up session with Papa Hsin will always start with him pulling out fruit, steamed buns or something he made from his bag and handing it over with a smile. I think it is his peace offering for all the smiles he didn't give me when he signed my report cards.

Similar to me, my dad grew up in many places. One of my favorite subjects to ask him about is the time when he lived in Saudi Arabia and worked as a martial arts trainer for the police force. The stories of endless deserts, lizard hunting with bearded men, drinking camel milk and getting lost in sandstorms. Terrorism, female rights. They were the stories that teleported me to faraway places and planted in me a seed for travel and social justice. In fact — one of my career goals as a high school student was to become a journalist and cover stories of war and in the Middle East. Of course, that didn’t end up happening and today, both of us settled in Canada where I work as a photographer and him as a retired officer. I like to think that we are both finding our peace and place here. Him in his garden, hosting dinners with Chinese neighbors and me in the kitchen, behind the camera, or off backpacking to another exciting location.

Food to me will always be magic. It is the art of creating something from simple and good ingredients. Food is a vehicle for stories, culture, and tradition. A delicious reminder that we are cared for and thought of.

So here to the new year, I hope it will be one filled with stories and meals shared over tables with conversations that are long and good.

korean_pears_still_life.jpg
roasted_korean_pears_with_ginger_recipe.jpg
baked_pears_ginger_brown_sugar_recipe.jpg

Roasted Korean pear with ginger

Ingredients:

• 4 Korean pears. Sliced in half with the seeds removed

• 1 tbsp fresh ground ginger*

• A dash of ground cinnamon

• A squeeze of lemon juice

• 1 tbs brown sugar (opt out if you aiming for less sugar)

Directions: 

1. Preheat the oven to 400 F. 

2. Place pears on a baking tray with cut sides up. Sprinkle ground ginger, cinnamon powder, lemon juice on pears. Top with brown sugar.

3. Bake for 20 minutes or until tender. 

4. Let the pears cool before serving, preferably with vanilla ice cream. Preferably with a friend. Enjoy.

*I like to use organic ginger since I find it more pungent. I've also found ginger jam to be a good substitute.

A photo of me and Papa in his yard. Shot on film in 2017.

A photo of me and Papa in his yard. Shot on film in 2017.

Happy New Year!